Ins and Outs of Vue 3 Reactivity
Vue.js 3.0.0 alpha was released on January 2020, and nine months later, on September 2020, vue-next 3.0 was released officially with the code name "One Piece" (yes, the anime). There was a lot of changes with the Vue 3, but I will discuss mainly on the new reactivity system for which I've been waiting.
In order to facilitate your understanding, this article contains simple codes that highlight the flow of the reactivity systems of vue@2.6.12 and vue-next@3.0.4.
Preface
Before we dive into how reactivity system in Vue 3 works, let's take a look at how it is implemented in Vue 2 and some of its caveats. Vue 2 implements reactivity system by going through all attributes of the data option that is passed to the Vue instance and using the Object.defineProperty.
class Dep {
  constructor () {
    this.subs = [];
  }
  depend() {
    if (Dep.target) {
      this.subs.push(Dep.target);
    }
  }
  notify() {
    for (let i = 0; i < this.subs.length; i++) {
      const sub = this.subs[i];
      sub();
    }
  }
}

class Watcher {
  constructor(getter) {
    this.getter = getter;
    this.get();
  }

  get() {
    Dep.target = this.getter;
    this.getter();
    Dep.target = null;
  }
}

function walk(data) {
  const keys = Object.keys(data);
  for (let i = 0; i < keys.length; i++) {
    defineReactive(data, keys[i]);
  }
}

function defineReactive(obj, key) {
  const dep = new Dep();
  let val = obj[key];

  Object.defineProperty(obj, key, {
    get() {
      dep.depend();
      return val;
    },
    set(newVal) {
      if (val === newVal) {
        return;
      }
      val = newVal;
      dep.notify();
    }
  })
}

const data = {a: 1, b: 2};
walk(data);

let sum = 0;
const watcher = new Watcher(() => {
  sum = data.a + data.b;
});

console.log(sum); // 3
data.a = 7;
console.log(sum); // 9
Here's how the code works, step-by-step.
- Vue walks through each and every property of
dataobject with thewalk()and addsget/settraps. -
The
getterthat was passed as parameter is executed with thenew Watcher(). Then, Vue accessesdata.aanddata.band activates thegettrap.dep.dependis called, and whendata.achanges,dep.depend()executesDep.targetthat usesdata.aand makes it reactive.- The steps for the
data.b'sgettrap is the same as 2.1.
sumis evaluated to be3.data.ais changed to7.data.a'ssettrap is called and calls thedep.notify().- The
subsarray found indephas agetter, so thegetteris executed to reevaluate the value ofsumto be 9.
Vue 2 reactivity system uses the Object.defineProperty, and therefore, cannot detect if a new property is added to the object or if an element of an array changes. Vue 2 had to use vm.$set() method to induce notify() by force. For arrays, if you take a look at observer/array.js, internal methods like push, pop, and shift support reactivity.
Vue 3 Reactivity
In Vue 3, you can make a reactive proxy like const obj = reactive({a: 0}). The Vue 3 reactivity system itself functions similarly to the Vue 2 reactivity system.
trackthe code when you access a valuetriggerthe tracked code when the value changes.
Let's take it step by step.
track: the code that will be executed reactively
Vue 3 uses the Map, Set, and WeakMap to implement the reactive data system. (obj and effect were used strictly as examples.)
const targetMap = new WeakMap();
function track(target, key) {
  let depsMap = targetMap.get(target);
  if (!depsMap) {
    targetMap.set(target, (depsMap = new Map()));
  }
  let dep = depsMap.get(key);
  if (!dep) {
    depsMap.set(key, (dep = new Set()));
  }
  dep.add(effect);
}

const numbers = {a: 1, b: 2};
const effect = () => {
  const sum = numbers.a + numbers.b;
}
track(numbers, 'a');
If you map out the collection structure above, you get the following.
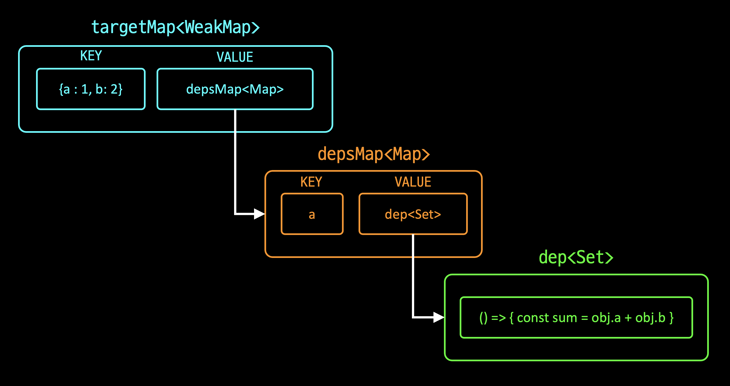
targetMap<WeakMap>tracks thetargetthat will be a reactive object.depsMap<Map>becomes the values for each reactive object and stores thekeyfor eachtarget.dep<Set>collection tracks the codes that are executed every time thekeyis changed.
trigger: executes the tracked code
Now, here's the basics of the trigger. The trigger finds the depsMap from the targetMap and then finds and executes the code to execute from the dep through the trap's key.
function trigger(target, key) {
  const depsMap = targetMap.get(target);
  if (!depsMap) {
    return;
  }

  const dep = depsMap.get(key);
  if (dep) {
    dep.forEach(eff => eff());
  }
}reactive: creating the reactive object
Let's look at the reactive function that calls track and trigger. Unlike Vue 2, Vue 3 uses a Proxy to implement the reactivity. Proxy does not modify the original object unlike Object.defineProperty and can detect new properties or changes of an object.
function reactive(target) {
  const proxy = new Proxy(
    target,
    {
      get(target, key, receiver) {
        const res = Reflect.get(target, key, receiver);
        track(target, key)

        return res;
      },
      set(target, key, value, receiver) {
        const oldValue = target[key];
        const res = Reflect.set(target, key, value, receiver);

        if (oldValue !== res) {
          trigger(target, key, value, oldValue);
        }
        return res;
      }
    }
  )

  return proxy;
}

const numbers = reactive({a: 1, b: 2});
activeEffect
So far, there is a small problem with the code. Whenever we access all properties of a reactive object, the get trap is called, calling track and continuously adding effect to deps. Furthermore, some reactive objects may require automatic response expressions to be registered manually.
Vue addresses this issue by the activeEffect variable. The code that will be executed reactively, the response expression, is only added to the deps when the activeEffect exists in the get trap.
Putting it all together
Let's put everything together and look at the flow of the Vue 3 Reactivity as a whole.
const targetMap = new WeakMap();

function track(target, key) {
  if (!activeEffect) {
    return;
  }
  let depsMap = targetMap.get(target);
  if (!depsMap) {
    targetMap.set(target, (depsMap = new Map()));
  }
  let dep = depsMap.get(key);
  if (!dep) {
    depsMap.set(key, (dep = new Set()));
  }
  if (!dep.has(activeEffect)) {
    dep.add(activeEffect);
  }
}

function trigger(target, key) {
  const depsMap = targetMap.get(target);
  if (!depsMap) {
    return;
  }

  const dep = depsMap.get(key);
  if (dep) {
    dep.forEach(effect => effect());
  }
}

function reactive(target) {
  const proxy = new Proxy(
    target,
    {
      get(target, key, receiver) {
        const res = Reflect.get(target, key, receiver);
        track(target, key);

        return res;
      },
      set(target, key, value, receiver) {
        const oldValue = target[key];
        const res = Reflect.set(target, key, value, receiver);

        if (oldValue !== res) {
          trigger(target, key, value, oldValue);
        }
        return res;
      }
    }
  )

  return proxy;
}

let activeEffect = null;

function effect(fn) {
  activeEffect = fn;
  fn();
  activeEffect = null;
}

const numbers = reactive({a: 1, b: 2});
const sumFn = () => { sum = numbers.a + numbers.b; };
const multiplyFn = () => { multiply = numbers.a * numbers.b };

let sum = 0;
let multiply = 0;

effect(sumFn);
effect(multiplyFn);

console.log(`sum: ${sum}, multiply: ${multiply}`);
numbers.a = 10;
console.log(`sum: ${sum}, multiply: ${multiply}`);
Here's how the code works, step-by-step.
- Create a reactive proxy with
reactive({a: 1, b: 2}). -
Pass and execute the
sumFnto theeffectfunction.sumFnis assigned to theactiveEffect.-
sumFnis executed.- Access
numbersaandb, and sinceactiveEffectexists, set thesumFnto be executed later indeps<Set>. 3is assigned to thesumas the function executes.
- Access
- Pass and execute the
multiplyFnto theeffectfunction, and the steps 2.1 and 2.2 are repeated. - When the
numbers.achanges, Vue finds all functions tracked ina'sdeps<Set>and executes every function.
Conclusion
The official Vue 3 Reactivity guide goes over a lot more of reactive handling, so taking the time to read through the document should help your understanding and development. In 2020, Vue released a web development kit Vite along with the Vue 3, and Ionic, framework used for hybrid web development, developed @ionic/vue, which is compatible with Vue 3.
In 2021, I look forward to more tools and companion libraries to gain compatibility with Vue.js 3, thereby extending the realm of Vue.js.