Dependency Management
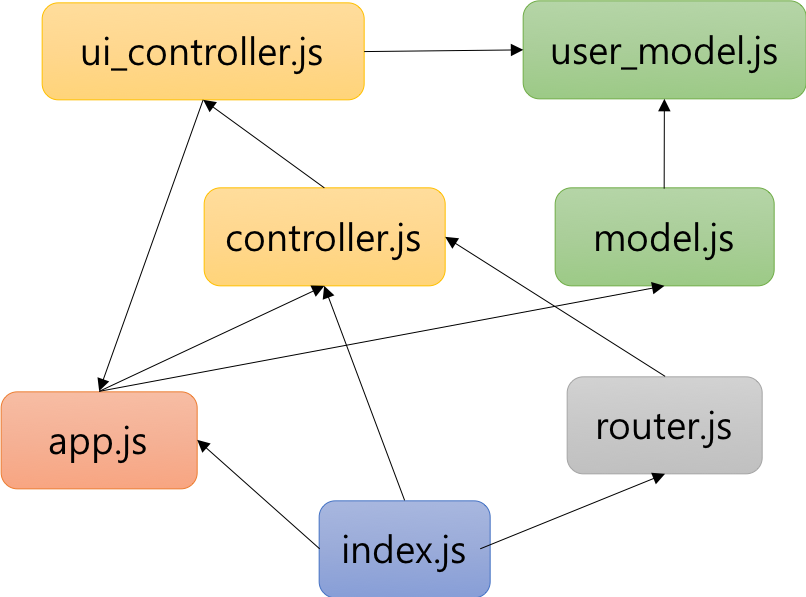
JavaScript was created to quickly validate the user input without the server communication. Although the first lines of JavaScript were distributed as means for simple tasks, recently, JavaScript has evolved into one of the major web development tools in the modern era. As JavaScript functionalities increased, the codes grew longer and more complicated. Granted, it was only natural for codes to be grouped together and separated according to the functionalities, but it resulted in a complex and dependent relationship as presented in the image below.
This guide will illustrate the ever more growing complexity of JavaScript codes and process of managing the dependencies. Prior to explaining the intricate process of dependency management, this document will go over necessity of modular programming, modular programming’s core systems like AMD, CommonJS, and ES6 Module, and finally, the dependency management using JavaScript’s package management tool npm. If the reader is familiar with the idea of JavaScript modules, the reader may wish to start at [Dependency Management Through npm].
Table of Contents
Necessity of Modular Programming
JavaScript is developed into multiple files to decrease the complexity, but just because the files are divided, does not mean that the codes are modularized. JavaScript uses a shared global scope even though the files are divided, and can cause unintentional errors in other files. Furthermore, each file has to load in accordance to the dependency sequence, and it is a hassle to enumerate each file’s dependencies one by one. However, by taking advantage of the modularized JavaScript, as the document will further elaborate upon, developers can not only use independent modularized scope to prevent contamination in the global scope, but also to program the module dependency as code. Therefore, in order to efficiently manage complex JavaScript programs, modular programming is a necessity. First, the following paragraphs will briefly explain global scope and module scope to further assist in understanding the modules.
Global Scope
JavaScript’s scope is mainly divided into the global scope and the local scope. Variables in the global scope can be accessed from anywhere, and even if the codes exist in different files, share the common global scope. In the example below, the JavaScript code is written under the script tag. This way, only variables declared within the function reside in the local scope, and other variables and functions are registered onto the global scope.
<html>
  <head>…</head>
  <body>
    <div>
      <script>
      var myName = 'Kim'; // global scope
      function hello() {  // global scope
        // local scope (function scope)
      }
      </script>
    </div>
  </body>
</html>
Now, let’s take a look at two different JavaScript files. In the example below, if A.js and B.js are executed sequentially, both files are placed into a shared global scope. Therefore, B.js file can access the name variable which was declared previously in the A.js file. As such, JavaScript operates under the same global scope even if the files are all separated.
// A.js
var name = 'foo';
function getName() {
  return name;
}
// B.js
function sayHello() {
alert('Hello ' + name); // Hello foo
}
sayHello();Module Scope
Module scope exists inside the module completely independent from the global scope. Functions and variables declared in the module scope cannot be accessed from outside of the module, except for functions and variables exported out of the module. The example below is a modularized version of the previously mentioned A.js and B.js using the ES6 module syntax. Additionally, modules can be loaded by specifying the module type in the script tag. (Ex: <script type="module" src"./js">)
// A.js
const name = 'foo';

export function getName() {
  return name;
}
// B.js
import {getName} from 'A';
export function sayHello() {
alert('Hello ' + getName()); // Hello foo
}The name variable, defined in the A.js and loaded as a module, is not included in the global scope, but is included in the module scope. Therefore, B.js cannot access the name directly, and can only gain access to the name through the getName function which was exported out of A.js. As such, modules can decide which variables and functions to grant exterior exposure, so using module scope can prevent different variables polluting the global scope. Also, because the code explicitly specifies the modules, it is easier to trace back the modular dependencies.
Module Systems
ES6 is required to use the module scope. Before ES6 was released, CommonJS and AMD provided different ways to define modules. This section will discuss the AMD, CommonJS, UMD, and ES6 Modules.
AMD
Asynchronous Module Definition (AMD) uses the define function asynchronously to define the modules’ APIs and its dependency relationships. The AMD syntax is not as intuitive as that of CommonJS. AMD is, however, immediately usable on browsers and supports dynamic loading. The most iconic library that supports the AMD is RequireJS.
define(['jquery', 'lodash'], function($, _) {
  function privateFn() {};
  function publicFn() {};

  return {
    publicFn: publicFn
  };
});
CommonJS
CommonJS uses the require function asynchronously to bring dependency modules, and uses module.exports object to define the module’s APIs. As the example below clearly demonstrates, the syntax is much more intuitive than that of AMD. However, CommonJS was developed to run JavaScript outside of the browser, so cannot be integrated to the web immediately. In order to use the JavaScript codes written in CommonJS in browsers, the code must go through a transformation process by a bundler. However, because Node uses CommonJS, CommonJS can be implemented immediately when developing Node based servers and tools.
var $ = require('jquery');
var _ = require('lodash');

function privateFn() {};
function publicFn() {};

module.exports = {
  publicFn: publicFn
};
UMD
Universal Module Definition (UMD) is a type of code pattern that supports various modularization methods. It uses a conditional statement to check whether the target supports AMD or CommonJS and adopts the compatible method to modularize the codes. It is very rare to manually code UMD, and most developers use codes auto-generated by bundlers.
(function (root, factory) {
  if (typeof define === 'function' && define.amd) {
    // AMD
    define(['jquery', 'lodash'], factory);
  } else if (typeof exports === 'object') {
    // Node, CommonJS-like
    module.exports = factory(require('jquery'), require('lodash'));
  } else {
    // Browser globals (root is window)
    root.myModule = factory(root.jQuery, root._);
  }
}(this, function ($, _) {
  function privateFn() {};
  function publicFn() {};

  return {
    publicFn: publicFn
  }
}));
ES6 Module
ES6 standardized modules and export and import keywords are used to define modules.
export/import
- To share the module with the outside,
exportkeyword is used. Variables, functions, and classes can be exported individually, and such method is called the named export.
// lib.js
export function sayHello() {
  console.log('Hello');
}- When importing from a named export, use the
importkeyword followed by the curly braces{…}.
// index.js
import {sayHello} from './lib';

sayHello(); // Hello- When importing a module,
askeyword can be used to change the name of the module. The example below changes the modulesayHellotohi.
// index.js
import {sayHello as hi} from './lib';

hi(); // Hello- When importing the entire module, a star
*is used.
// index.js
import * as lib from './lib';

lib.sayHello(); // Hello- The curly braces
{…}are not required when importing a module fromdefault export.
// lib.js
export default function sayHello() {
  console.log('Hello');
}
// index.js
import sayHello from './lib';
sayHello(); // HelloStatic Import
ES6 modules cannot be dynamically imported or exported as presented below. Because a module to be imported or exported cannot be changed at the point of import or export, JavaScript automatically optimizes the code transfer by statically analyzing the import and export statements when bundling and disregarding the unused codes. The process of disregarding the unused codes are supported by bundling tools like Webpack.
// Following codes will not run
if (sum > 10) {
  import * from './big'; // SyntaxError
} else {
  import * from './small'; // SyntaxError
}
Additionally, dynamic import() statement is under draft at the ECMAScripts specifications, and will be compatible from Chrome version 63.
Supporting Environments
Browsers
Browsers that support ES6 modules currently are as follows:
- Chrome 61 +
- Safari 10.1 +
- Firefox 54 + (requires dom.moduleScripts.enabled setting)
- Edge 16 + (15 requires Experimental Javascript Feature setting)
For browsers that do not support the ES6 modules, transpilers and bundlers (Webpack and Rollup) are used to convert the codes to be compatible with different browsers. Bundlers will be explained in greater detail in the [FE Guide] Bundler.
Node
Node currently uses CommonJS to support modules, but is planning on adopting the ES6 modules. Therefore, the use of .mjs extender is being discussed to differentiate the current CommonJS modules and ES6 modules.
Dependency Management Through npm
If a script tag is used to load JavaScript files, it creates consequentially laborious tasks of sequencing necessary packages according to the dependency and managing each package version accordingly. However, using an npm, it can all be done with a package.json file.
Npm is a JavaScript package (module) storage. Anyone can upload his or her own package on npm, and the package information must be registered in the package.json setting file. Package.json file not only requires basic information like the package name and the version, but also requires the corresponding dependencies. Therefore, code dependencies can be validated using the package.json file. Also, npm provides a command line interface (CLI). CLI is installed automatically when Node.js is installed, and can use the npm command to install/delete/update packages.
Additionally, beside npm, other package managers like yarn exists. Yarn uses the npm storage and was created to compensate for the shortcomings of npm. Although the internal commands managing packages are different, that fact that yarn manages dependencies based on package.json remains identical. Therefore, it is possible to use packages developed using yarn in npm environments.
npm CLI Commands
npm init: generates a package.json filenpm install: installs every dependency packages mentioned in package.jsonnpm install [package name]: installs the package and registers it to dependencies in package.jsonnpm install [package name] -g: installs the package globallynpm install [package name] --save-dev: installs the package and registers it to devDependencies in package.jsonnpm update: updates every package listed on dependencies and devDependencies in package.json, and updates the version informationnpm update [package name]: updates the package and the version information in package.jsonnpm update [package name] --no-save: updates the package without updating the version information on package.jsonnpm prune: uninstalls any packages not mentioned in package.json
Global Install vs. Local Install
Let’s see how the global install differs from local install.
-
Global Install
-goption is used along withnpm installcommand- packages installed globally are saved in either
/usr/local/lib/node_modulesor/usr/local/bin(For windows,c:\Users\%USERNAME%\AppData\Roaming\npm\node_modules) - packages used for multiple projects are recommended to be installed globally
-
Local install
- installed locally if no special options are mentioned with
npm install - packages installed locally are saved in the
node_modulesfolder at the project’s root folder - packages installed locally can only be used for that particular project
- installed locally if no special options are mentioned with
package.json
The setting file, package.json, contains following information regarding the package.
name,version,description: name, version, and the description of the packagescript: registers a simple script like a script to execute builds and tests to run with the node_module as the relative pathmain: the beginning of the package; validates dependencies with this file as base-
dependencies- defines the necessary dependencies required for this package to run
- since this information is required for the package to run, is always included when bundled or distributed
- when
npm installcommand executes, installs every dependency file in the dependency tree
-
devDependencies- defines the dependency used to develop this package
- only required during development; not included when bundled or distributed
Example of package.json (package.json file for tui-tree)
{
    "name": "tui-tree",
    "version": "3.5.0",
    "main": "dist/tui-tree",
    "scripts": {
        "test": "karma start --no-single-run",
        "test:ne": "KARMA_SERVER=ne karma start",
        "bundle": "webpack && webpack -p",
        "serve": "webpack-dev-server --inline --hot -d",
        "serve:ie8": "webpack-dev-server -d",
        "cpy-dist2doc": "mkdir -p doc/dist && cp -f -r dist doc",
        "doc": "jsdoc -c jsdoc.conf.json && npm run cpy-dist2doc"
    },
    "description": "TOAST UI Component: Tree",
    "repository": "https://github.com/nhn/tui.tree.git",
    "keywords": [
        "nhn",
        "tui",
        "component",
        "tree",
        "nhn cloud
    ],
    "author": "NHN Cloud FE Development Lab <dl_javascript@nhn.com>",
    "license": "MIT",
    "devDependencies": {
        "css-loader": "^0.26.1",
        "eslint": "^4.5.0",
        "eslint-config-tui": "^1.0.1",
        "eslint-loader": "^1.6.1",
        "extract-text-webpack-plugin": "^1.0.1",
        "file-loader": "^0.11.2",
        "istanbul-instrumenter-loader": "^1.0.0",
        "jasmine-ajax": "^3.2.0",
        "jasmine-core": "^2.3.4",
        "jasmine-jquery": "^2.0.5",
        "jsdoc": "^3.5.4",
        "karma": "1.3.0",
        "karma-chrome-launcher": "^2.0.0",
        "karma-coverage": "^1.1.1",
        "karma-es5-shim": "^0.0.4",
        "karma-firefox-launcher": "^1.0.0",
        "karma-jasmine": "^1.0.2",
        "karma-jquery": "^0.2.2",
        "karma-junit-reporter": "^1.2.0",
        "karma-safari-launcher": "^1.0.0",
        "karma-sourcemap-loader": "^0.3.7",
        "karma-webdriver-launcher": "git+https://github.com/nhn/karma-webdriver-launcher.git#v1.1.0",
        "karma-webpack": "^1.8.0",
        "safe-umd-webpack-plugin": "0.0.2",
        "style-loader": "^0.13.1",
        "tui-jsdoc-template": "^1.1.0",
        "url-loader": "^0.5.7",
        "webpack": "^1.13.3",
        "webpack-dev-server": "^1.11.0"
    },
    "dependencies": {
        "tui-code-snippet": "^1.3.0",
        "tui-context-menu": "^2.0.0"
    }
}
package-lock.json (v5~)
Even when installed with the identical package.json file, it is possible to have different packages installed in nodemodules depending on the time of installation. This happens because there is a possibility that the dependent package could have been updated at the time of installation. To created the exactly identical nodemodules, from npm 5, package-lock.json was created.
Package-lock.json is automatically generated when npm install command runs, and saves the version information and dependency relationship of currently installed packages. Therefore, users can install and use the dependent packages from the development environment as they are. In order to do this, package-lock.json must also be included in the version control system.
Provided below is an example of a package-lock.json file.
"jquery": {
    "version": "1.11.0",
    "resolved": "https://registry.npmjs.org/jquery/-/jquery-1.11.0.tgz",
    "integrity": "sha1-xnzu4ZtANlDWgq3POdXJAJgU2Uk=",
    "dev": true
}
Priorities Regarding Dependency Search
This section explains in detail where the dependent package is installed and the dependency search priorities.
node_modules Directory
- every file installed using
npmis installed in thenode_modulesdirectory -
up until npm v3, every lower dependency was installed onto a lower directory
node_modules/a/node_modules/b/node_modules/c
-
from npm v3, lower dependencies are installed close to the root directory
node_modules/anode_modules/bnode_modules/c
Priorities During require(‘jquery’)
- The
jqueryfile in the folder of the source of the require - The
jquery.jsfile in the folder of the source of the require - The
jquery.jsonfile in the folder of the source of the require - The
jquery.nodefile in the folder of the source of the require -
Check the
node_modules/jquerydirectory at the root folder of the current package- file defined in
mainofpackage.json index.jsindex.jsonindex.node
- file defined in
- Check the
node_modules/jquerydirectory in the upper package
Marking Dependency Version
Npm follows the versioning rules known as the semver. Therefore, when marking the version of the dependency package in package.json or releasing a new version of a package, the version must follow the semver rules. Semver tells developers crucial information whether the package is backwards compatible, which is extremely helpful when managing dependencies.
Semantic Versioning consists of MAJOR, MINOR, and PATCH versions, and versions are marked MAJOR.MINOR.PATCH. Each versions are explained below.
- MAJOR Version: changed when an API change occurs that does not guarantee backwards compatibility
- MINOR Version: changed when either an API or a new feature is added that guarantees backwards compatibility
- PATCH Version: changed when guarantees backwards compatibility and fixes the bug
Tilde (~) Range
-
If the file is marked MINOR, only PATCH changes are allowed, and if it is not marked with MINOR, MINOR changes are also allowed.
- ~1.2.3 : >= 1.2.3 < 1.3.0
- ~1.2 : >= 1.2.0 < 1.3.0 : 1.2.x
- ~1 : >= 1.0.0 < 2.0.0 : 1.x
Caret (^) Range
-
Updates the file so that it is backwards compatible.
- ^1.2.3 : >= 1.2.3 < 2.0.0
- ^1.2 : >= 1.2.0 < 2.0.0
- ^1 : >= 1.0.0 < 2.0.0
- ^0.1.2 : >= 0.1.2 < 0.2.0 (Exception: Before v1.0.0, works like Tilde due to frequent API changes.)
Others
- latest: Always maintain the most recent version
- x, X, and * is used for random numbers
- both equality signs and inequality signs can be used
Afterword
This document was written to inspect the JavaScript modules and dependency management techniques. Because modularization does not happen just because files are divided into multiple files, modular programming can be used to develop independent modules and efficiently manage inter-modular relationships. Also, with the help of npm, the JavaScript package manager, developers can systematically manage the dependent modules. The author hopes that this document successfully assists developers to effectively manage JavaScript codes and program modularly.
This document is an official Web Front-End development guide written and maintained by NHN Cloud FE Development Lab. Any errors, questions, and points of improvement pertaining to this document should be addressed to the official support channel (dl_javascript@nhn.com).
| Last Modified |
|---|
| 2019. 05. 13 |